Step 1: Understand Domain Nameservers
Domain nameservers act as the bridge between your domain name and the hosting/space where your website resides. Changing nameservers involves updating these records to ensure your domain points to the correct hosting and ensuring your website is available for anyone searching your domain.
This is a very simple. Need a TL/DR version?
Log in to where you bought your domain > find the DNS settings > find the new nameserver values >copy-pasting over what is already in the DNS settings (well and press save!).
Step 2: Identify Your Current Nameservers
Before making any changes, it’s important to identify your current nameservers. This information is typically provided by your domain registrar, the company from which you purchased your domain (for example, Google Domains, Hosting, Namecheap, GoDaddy).
Here’s how you can locate your current nameservers:
- Visit the website where you bought your domain and log into your account.
- Navigate to the domain management (or DNS) settings.
- Locate the current nameserver entries, which usually appear as a set of two or more addresses.
Step 3: Choose Your New Hosting Provider’s Nameservers
If you’re moving your domain to a new hosting provider, you’ll need to obtain the nameserver information from your new provider. This information is usually available in the welcome email or account dashboard provided by the hosting company. If you’re unsure, reach out to their customer support for assistance.
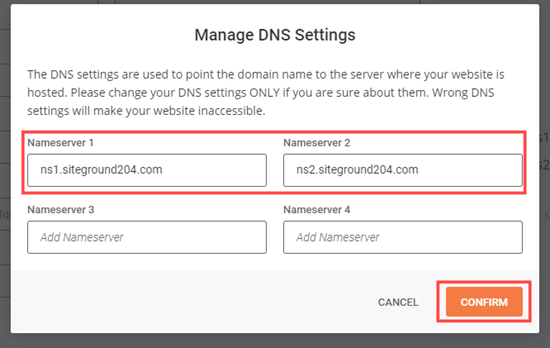
Step 4: Update Nameservers at Your Domain Registrar
Once you have your new hosting provider’s nameservers and have identified your current nameservers, it’s time to update the records at your domain registrar. Paste over the values that are already there and hit save.
Step 5: Allow Time for Propagation
After updating the nameservers, it may take some time for the changes to propagate throughout the internet. This process, known as DNS propagation, typically takes a few hours to up to 48 hours.
I like to use this website to verify https://dnschecker.org.
Conclusion
Changing domain nameservers is a relatively simple process that allows you to point your domain to a new hosting provider or update your server settings. By following the steps outlined in this guide, you can confidently update your domain’s nameserver information and ensure that your website is accessible to visitors using the updated settings. Remember to allow time for DNS propagation and verify the changes to ensure a smooth transition for your domain.